4 Essentials For Drawing

“It takes courage to ignore knowledge and respond to what we see instead…. If you are to grow and develop as an artist, it is necessary to develop that courage”
Greg Albert and Rachel Wolf, “Basic Drawing Techniques”, 1991.
I once asked every artist I knew if drawing was important. For me, I like painting, so I sort of underestimated the value of drawing. Yikes. Every artist I contacted came screeching around a corner at me to remind me that drawing is the wheat germ* of all visual arts.
(*That would be the heart, the soul, the embryo of the wheat kernel and the source of all vitality, strength and goodness of the wheat…. a bit of an adaptation by me of the actual definition.)
Drawing is hard. I wish I could say it is easy or comes back as easily as riding a bike. But I have found that is not the case.
Some people have it woven into their DNA. I have taught students like that. Give them a few tips, a few techniques, a few rules and ratios and they are locked on. No problem.
But for most of us, it is a struggle to overcome our natural inclination to draw from our memories and the “naming” function in our brains. We simplify what we are seeing. We ignore the details. We stubbornly override the necessity to draw what we are actually seeing.
Frederick Franck, author of My Eye is in Love: Revelations on the Act of Seeing by Drawing, described it this way:
“All the hand has to be is the unquestioning seismograph that notes down something, the meaning of which it knows not. The less the conscious personality of the artist interferes, the more truthful and personal the tracing becomes.”
As a painter, sculptor, and author of more than 30 books on Buddhism and other subjects, Franck, in summary, was an expert on seeing and thinking about seeing. In other words, the less we think, the better we are at drawing.
Here are 4 essentials for drawing:
1. Have a Zen mindset.
Very few of us are Zen masters or Buddhist monks. BUT we all can “consciously uncouple” ourselves to our wired-tired-mired lives. We can disconnect our frazzled left brain that deals with technology, logistics, budgets, and most of our daily lives. We can pull our right brain out of storage. This is our creative, intuitive, fun-loving, childlike “ah-ha!” center of our minds. This is where we should be spending more time. This is key to drawing.
Take some deep breaths. Be mindful. Accept who you are and your drawing skills and experience.
The quietness that can come to you through drawing may allow you clarity of thought on other matters.
2. Get the right tools for making marks.
Honestly, this isn’t too difficult.
In fact, you can use what you have handy.
For example, long ago in c. 17,000 – c. 15,000 BCE, our artistic stone age ancestors drew and painted on the walls of the Lascaux Cave.

The images on the walls of this Palaeolithic cave in southwestern France may have been created with whatever they had handy.
Techniques include drawing with fingers or charcoal, applying pigment with ‘brushes’ made of hair or moss, and blowing the pigment on a stencil or directly onto the wall with, for instance, a hollow bone.
Lascaux Cave, Emma Groeneveld, September 2016.
Very resourceful.
Now, if you want to spend a bit more… this photo shows, among other things, a set of pencils.

You don’t have to get a whole set, but this is one that I have and use. It’s from Derwent. Cretacolor or General are also brands that I have.
Naturally, as an artist and art teacher, I have WAY more pencils than I will ever use. I even have a pencil collection. (When friends travel to various ports in the world, they bring me a pencil for my collection…. but that’s another post.)
Notice the tape around the pencil box?
I put artist’s tape around my pencils so they don’t fall out when I travel with my materials, or candidly, even when I knock them off my drawing table. (Hence the dented box.) The tape against the pencils is created with two pieces of tape with sticky sides together. That allows me to slide the pencils under the tape to get them in and out.
Also shown: Additional chalk pencils in white and sanquine-color. They are just luxuriously lovely pencils.
Also shown: My favorite erasers. Do not use the erasers on your pencils or the ones you find in the back corner of a drawer. They will make you sad.
Also shown: The little white pencil-like tool with two sharpened ends is actually a stump blender (or tortillon –which means a tool to smear the marks you made). This tool is not required. As with the cave drawers, you can always use your finger or a bunch of moss to also blend your pencil marks. But having this knowledge of what it is and what it can do puts you ahead in the DYK (did you know) category in the car pool. They are handy and can be sharpened in a sharpener or on sand paper. I have seen blog posts on how you can make your own by tightly rolling paper and steaming it together or something… but again, a finger, a tissue or buying this one for like two bucks does the trick.
3. Find some paper.
Sketchbook. Loose sheets of paper. Drawing pad. Whatever paper is handy. It all works.
For example the Plains Indians of the Midwestern region in the US used ledger paper (accounting paper with columns printed on the paper) and other paper retrieved from the US Army troops with whom they interacted.
The riveting art often depicted drawings of battles. Naturally, the point of view is that of the artist — frequently a Lakota, Sioux, Cheyenne, or Kiowa artist. The stories give an important non-dominant portrayal of battles and daily life on the prairie. I find them beautiful as art, and important as documentation of our history.
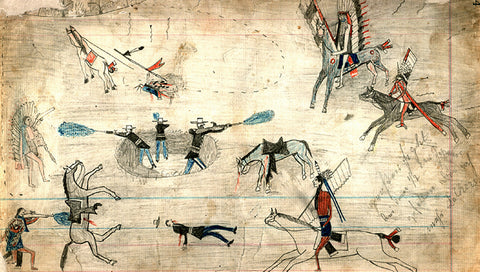 A Kiowa ledger drawing possibly depicting the Buffalo Wallow battle in 1874, a fight between Southern Plains Indians and the US Army during the Red River War.
 A Cheyenne Shield Carrier lances a woman in the back as she and another man attempt to escape on horseback. Two other arrows, drawn in pencil, appear to have missed their mark. 1884 on ledger paper. From the collection of the Metropolitan Museum, NY.
Native art on ledger paper was created primarily from the 1860s to the 1920s. There is a resurgence of it now. It is a distinctly Native American art form.
I like a paper with some tooth (surface texture). And, for me, I prefer a paper that is not too flimsy. A weight of a 140 lb paper or heavier seems to have the right heft. The weight refers to the total weight of a ream of the sheets at that thickness. A bigger number (generally) means a thicker paper. At 140 lb or heavier, it won’t bleed through if I use markers.
Artists like Michelangelo used vellum or in some situations, paper. Paper was a cherished commodity.

Michelangelo Buonarroti, studio di braccia
per l’ebbezza di noe della cappella sistina, 1508-90.
(Study for his work on the ceiling of the Sistine Chapel)
Sailko (Own work) CC BY3.0 via Wikimedia commons.
Paper, as we generally define it or understand it, was invented in China by Ts’ai Lun from beaten bark at about 105 AD. The secrets of early paper making were closely guarded. That secrecy may have limited the commercial vision for the product. It was slow to be adopted.
It didn’t gain a global foothold until after 1100. The Arabs acquired the secrets of paper making “as one of the spoils of war.” It was Arabian traders who spread the use of paper to Italy and other parts of Europe.
Fabriano opened a paper mill in Italy in 1264. Its success as a thriving business was enhanced by its proximity to the town of Ancona, the seaport that traded with the Arab world.
And, although I could draw on cheap bond paper purchased for my HP Printer, it’s a thrill to use Fabriano paper. I get to daydream in the exotic history of the product, as well as I get to create a new work of art on a lovely paper.
4. Surprise: Practice. (Well, really no surprise)
It seems our left brain is so dominant that if we take too long a break from drawing, we get rusty in our ability to really see what we are looking at. We get cranky and want our left brain to fill in details from memory–not from looking at what is in front of us.
We lose the gestures in our hands to create the marks we have come to love. We forget about proportion and foreshortening. It’s a mess.
As a review, drawing is made up of a few techniques like: understanding outlines (contours) or edges; understanding mass and foreshortening; having a variety of marks (lines, crosshatching, scribbling, dots, etc.) to use to convey value or shading; paying attention to light and dark; and critical observation. It’s made up of a few tools and it is drawn onto some sort of substrate–generally paper.
To be the most proficient artists in your peer group, yes, some talent is required.

Anonymous, Italian, mid-16th Century.
Red chalk on paper.
From the collection of the Metropolitan Museum, NY.
But most of it is practicing. They say it’s a good idea to draw something every day.
So, here’s my prescription for drawing and sketching, pick up a pencil and draw something. Today. Tomorrow. The next day. Etc.
Connect yourself to about 20,000 years of your artistic ancestors.
Looking for something to color? Take a look at our coloring pages.
Did you like this information? All of my blog posts start as an e-letter and my next e-letter is due out soon. Don't miss out!


Send a message or leave a comment